The template is an important part of any WordPress. Here’s our guide to creating and installing a custom WordPress template.

Every WordPress website has several elements that are the same. These elements include things like themes, plugins, security, a template and more. One of the first steps that WordPress users need to complete when building their website after installation is choosing templates for their website.
This is an important step because the templates set up the look and feel of your website. The average person spends just a few seconds on a website, analyzing everything from the content to the colors to the design, and deciding to continue searching through the pages or move on to another website.
A template is the groundwork for the visual aspect of your WordPress website and defines the first impression that people have when they first visit your website. Templates can be customized and edited however the admin wants to make their website look unique.
May 2025 Offer – For a Limited Time Only:
Get WordPress 99+ Plugins Mega Bundle for 15% off! Don’t miss out!
1) What Is a Custom Template?
![What Is a Custom Template? - [WP101] Creating and Installing Custom Template](https://www.cminds.com/wp-content/uploads/WordPress_themes_rectangle_2_Illustrative_Banner_Blog-1024x300.jpg)
A template is a sample document that has already some details in place or is pre-formatted in some way. For our discussion, we can consider a template as usually the layout of a single page on your website and is just one file in a theme. Templates are also easily customizable so users can make their own templates.
Custom templates cut down on the workload by allowing admin to place custom templates content on multiple pages and posts on your WordPress website. Users have complete control over each element’s placement and overall appearance.
CM Plugins With Custom Template Settings
These CM plugins allow you to easily change the template from the settings. Check the documentation about each:
CM FAQ | CM Video Lessons Manager | CM Expert Directory | CM Product Directory | CM Business Directory | CM Course Catalog
Creating A Custom Template

It’s much simpler to copy a template that is already being used by another page then building one from scratch, as this requires extensive coding knowledge.
Creating and installing a custom template is a simple five-step process of finding the default template, copying the template, customizing the template file, customizing the code and uploading the template.
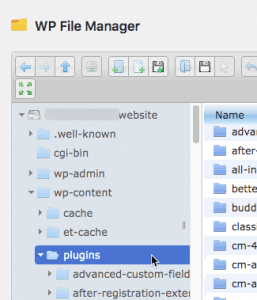
Templates are stored as files in WordPress. So first you will need to locate the plugin folder where the files are kept. This is usually in a file manager plugin so navigate there. WordPress will want to use the most appropriate template file that fits with your chosen theme.

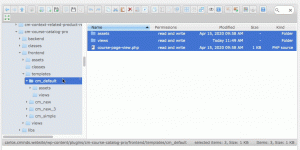
Once you locate the folder with the files you want, and then in the drop-down menu find the templates folder. Copy the contents of this folder and then locate the themes folder. Click on it and create a new folder to copy the template here. Basically, you copy the template info from the plugin to the theme.

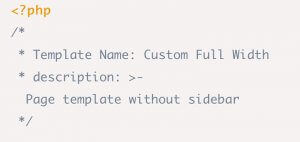
The next step is to customize the template file so that WordPress knows that it is a custom page template. It looks like this:

The name under ‘Template Name’ is what will be displayed under ‘Page Attributes’ in the WordPress editor. All users have to do is change the template name.
The next step is to customize the code. Users can simply remove code or add code in order to make changes and add or remove elements of the template. Save the file and the process is nearly complete.
Finally, users will need to upload the page template. This saved file can be saved in the theme folder or the folder of the main parent theme in your file manager.
Installing A Custom Template
![Installing A Custom Template - [WP101] Creating and Installing Custom Template](https://www.cminds.com/wp-content/uploads/Ecommerce_story_rectangle_2_Illustrative_Banner_Blog-1-1024x300.jpg)
With WordPress, it is also possible to manually assign custom templates to specific pages. Admin will need to locate the template file and then link it to the page they want to use it for.
Go to the file manager and upload the edited or customized files to the template folder. Users will probably be prompted to override older versions of the file and they should so that the updated files are saved to the folder.
Next, go to the WordPress dashboard plugin settings on the left sidebar in WordPress. Once opened, click on the course page tab to see the default settings. In the page defaults box, there is a button for the default template. Underneath is a button for applying a template. Click the apply button.
![Installing A Custom Template instructions - [WP101] Creating and Installing Custom Template](https://www.cminds.com/wp-content/uploads/file-TUoemJnlgE-300x145.png)
Also, when editing a page in WordPress, there is a template box in the backend. Simply click the default button to open a drop-down menu and choose to apply a new custom template. Here is a good guide for applying custom templates.
Conclusion
![Custom Template - [WP101] Creating and Installing Custom Template](https://www.cminds.com/wp-content/uploads/WP_WebCreate_Illustrative_Banner.jpg)
A template is a major part of any WordPress website and it is also fully customizable. Creating and installing custom templates can be a technical process but it is an important and essential feature for WordPress webpages. Users can customize pretty much anything on any page with a template.
Creating a custom template is a simple five-step process, or even less if you don’t want to involve any coding at all. Simply copy and paste the template to a different folder, customizing the content, customizing the code, and reuploading the file.
Templates allow for the customization of your WordPress website very user-friendly and allow you to assign unique functionality, as well as design as many different webpages as possible. The possibilities of creating and installing custom templates is endless. It’s important to create and use templates that work best for your WordPress website.


